
Introduction:
In the era of cloud computing and microservices architecture, the way we build, ship, and run applications has transformed dramatically. At the forefront of this evolution is Docker, a powerful tool that enables developers to automate the deployment of applications within lightweight, portable containers. This guide aims to provide you with a comprehensive understanding of Docker, from installation to deployment, ensuring you can harness its full potential in your development workflow.
Understanding Docker: An Overview
Before diving into the installation and practical usage of Docker, it is essential to understand what Docker is and why it has become a staple in modern application development.
What is Docker?
Docker is an open-source platform that uses OS-level virtualization to deliver software in packages called containers. A container encapsulates everything required to run an application including any dependent software. This makes it easy to move that application across different environments. Unlike traditional virtual machines (VMs), containers share the host operating system’s kernel but run isolated from one another, making them lightweight and efficient in resource utilization.
Benefits of Using Docker
Consistency Across Environments: Docker containers ensure that your application runs the same irrespective of the environment (development, testing, production).
Isolation: Each application runs in its environment, preventing conflicts between dependencies.
Portability: Docker can run on any system that has Docker installed, regardless of the underlying infrastructure.
Scalability: Docker makes it easy to scale applications up and down based on demand.
Resource Efficiency: Containers are lightweight and start quickly, maximizing the use of system resources.
Prerequisites for Docker Installation
Before installing Docker, ensure that your system meets the minimum requirements. Docker supports macOS, Windows, and various Linux distributions. Here are the general requirements:
Operating System: Windows 10 or later, macOS 10.14 or later, or a recent version of a Linux distribution (Ubuntu, CentOS, etc.).
CPU: Virtualization support must be enabled in your BIOS.
RAM: At least 4GB of RAM is recommended.
Disk space: Sufficient disk space to accommodate images and containers.
Installing Docker
Docker Desktop for Windows and Mac
Download Docker Desktop:
Go to the Docker Hub and download the Docker Desktop installer.
Install Docker Desktop:
Follow the on-screen instructions for installation.
Ensure you enable WSL 2 during installation for improved performance on Windows.
Start Docker Desktop:
Once installed, launch Docker Desktop and follow any setup prompts.
Verify the installation by running docker –version in your terminal.
Docker Engine on Linux
Depending on your distribution, you can install Docker using the following steps (example: Ubuntu):
Update your existing list of packages:

Install required packages:

Add Docker’s official GPG key:

Add the Docker repository:
sudo add-apt-repository “deb [arch=amd64] https://download.docker.com/linux/ubuntu $(lsb_release -cs) stable”
Update packages again and install Docker:

Check the Docker service:
Verify Docker installation:

Basic Docker Commands
- docker –version: Check the installed Docker version.
- docker info: View system-wide information about Docker.
- docker pull <image>: Download a specific Docker image from Docker Hub.
- docker images: List all available images on your local system.
- docker rmi <image>: Remove a specific image.
- docker ps: Display currently running containers.
- docker stop <container>: Stop a running container.
- docker rm <container>: Remove a stopped container.
Creating a Dockerfile
A Dockerfile is a text file that contains all the commands to assemble an image. Here is a simple example:
Understanding Docker Images and Containers:
Docker Image: An image is the blueprint for a container and contains everything needed to run an application, including the code, runtime, libraries, and environment variables.
Docker Container: A container is a running instance of an image. You can create, run, and manage containers based on images.
Building a Docker Image
To build a Docker image from a Dockerfile, navigate to the directory containing your Dockerfile and execute:
Running a Docker Container
To run a container from the image you just built:
This command maps port 80 inside the container to port 4000 on your host, allowing you to access the application via http://localhost:4000.
Docker Compose
Docker Compose is a tool for defining and running multi-container Docker applications. It uses a docker-compose.yml file to configure your application services. Here is an example for a web service application:
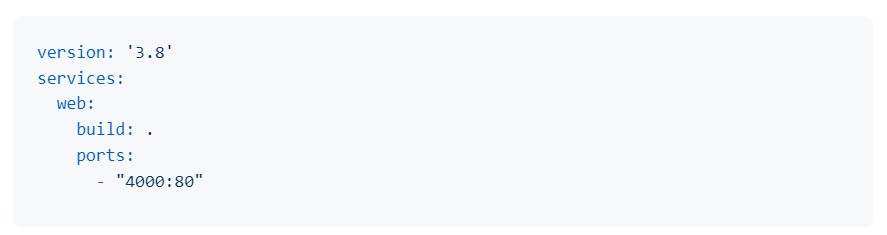
To start your application with Docker Compose, run:

Deploying Docker Containers
Containers can be deployed using several platforms including:
Docker Swarm: Native clustering and orchestration for Docker, managing multiple containers across multiple hosts.
Kubernetes: A robust container orchestration tool suitable for larger applications.
Docker Hub: A cloud-based repository for sharing Docker images.
Deploying with Kubernetes
Kubernetes is a more advanced method of orchestrating containers. Below is a basic example of how to deploy a Docker container using Kubernetes.
Step 1: Install kubectl
You’ll need kubectl, the Kubernetes command-line tool. Follow the instructions for your platform from the Kubernetes documentation.
Step 2: Create a Deployment YAML File
Create a deployment.yaml file for your application:
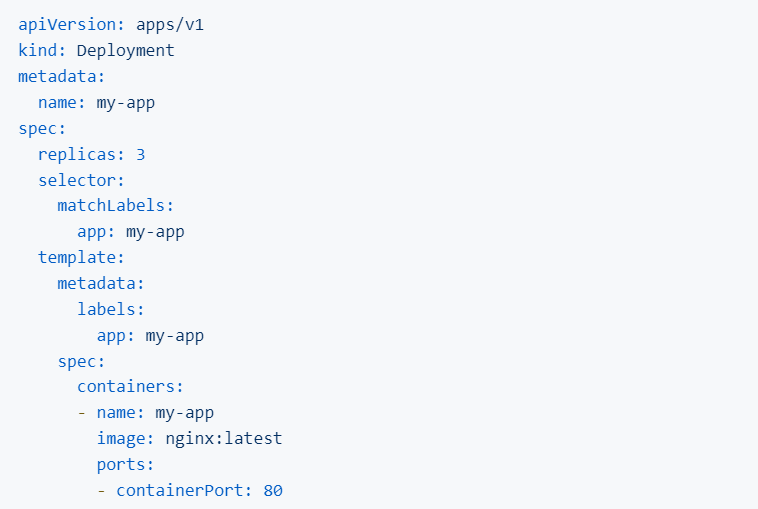
This YAML file describes a deployment of NGINX with 3 replicas.
Step 3: Apply the Deployment
Run the following command to create the deployment in Kubernetes:

Step 4: Expose the Deployment
Next, expose the deployment so it can be accessed externally:

Step 5: Get the Service Information
Check the services to find the assigned port:

You may see something like:

Here, xxxxx is the NodePort assigned for accessing the service.
Step 6: Access the Application