Rasa can be used to create task-oriented discussion systems. The term “task-oriented” refers to a user who is focused on completing a certain task. The term “dialogue system” refers to automated systems that engage in a two-way discourse. This indicates that the assistant is able to talk with the user and assist with completing the task they’re interested in.
The fundamental component of creating a Rasa assistant is providing scenarios in which your system can be trained. Rasa will then try to generalise any patterns it finds in your data.
Rasa Components
NLU
Natural language understanding, or NLU, is the component of Rasa that can convert plain text into intents and entities after accepting it. It may be neural network-based or rule-based. Using examples supplied, the DIET neural network architecture divides texts into intents and entities. While neural systems need more training data and computing resources, rule-based approaches are lighter and require more domain expertise.
Dialogue Policies
Dialogue Policies are what determine what should be done next. Rasa offers a neural network called TED that chooses the next best turn based on the discussion so far and all the conversations it was trained on, but also lets users to specify their own rules to define what needs to happen. Rasa advises combining rule-based strategies with neural techniques.
Installation
- Create a virtual env
- conda create -n envname python=x.x
- Activate the virtual env
- conda activate envname
- Install rasa using pip
- pip install rasa
Initialization
- Create a new directory
- In the terminal type “rasa init” this command will create a assistant for you which has all the basic files. This bot is simple which is referred as mood_bot.
- You’ll able to communicate with mood bot
- Rasa init command will create so many files in the directory. The file structure is shown below: –
- It’s helpful to know what some of these files are used for. So, as a brief summary:
- The file where everything comes together is called domain.yml.
- The configuration for your machine learning model is located in the config.yml file.
- The data folder includes information that will be used to train your assistant.
- Examples of your intents and entities can be found in the nlu.yml file.
- Examples of conversation turns can be seen in the stories.yml file.
- With respect to dialogue policies, you’ll find predefined rules in the rules.yml file.
Commands
There are few commands you need to be aware of are as follow: –
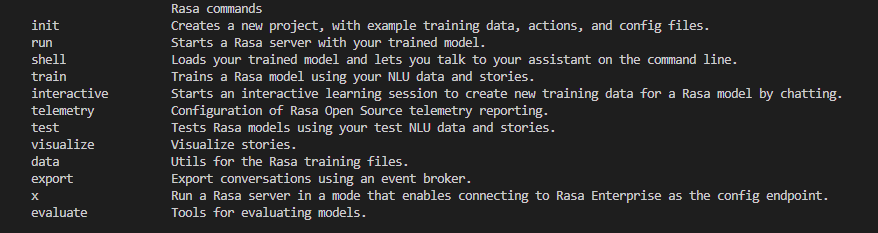
You need to add “rasa” as prefix to all the above commands.
Domain File: –
This is the file where configuration for assistant is stored.
- Responses: These are the things the assistant can say in response to users.
- Intents: These are groups of things that people say.
- Slots: These are details that may be recalled from a discussion.
- Entities are details of information that have been taken from incoming text.
- Forms and actions: These enhance application logic and broaden the capabilities of your assistant.
Responses
Example of responses:
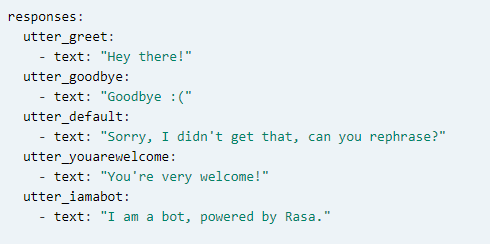
You can see utter_intent as this is the naming convection Rasa follow. You also give dynamic response to user. Like image, use buttons and dynamic links etc.
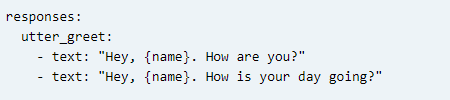
Here your assistant will reply with the name of user who is interacting. And response will be selected randomly from the given two responses.
Rasa will give priority to responses in following order: –
- Conditional Response variations with matching channel
- Default responses with matching channel
- Conditional response with no matching channel
- Default responses with no matching channel
For more information regarding domain file click here
Intent
We need to define intents which user will used to chat with your assistant.
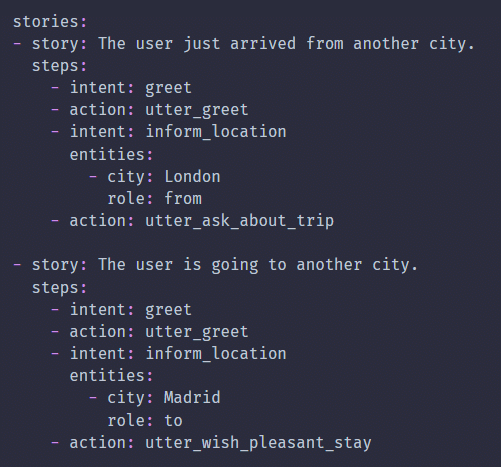
Stories
Stories represent the conversational flow. If you already have patterns than you use it or you can make it by yourself. There is rasa interactive command which you can also use to create the stories for your assistant.
Here Memoization policy will be used. It checks if the current conversations match any flow from the stories if your assistant find the match it will predict the next action from the stories.
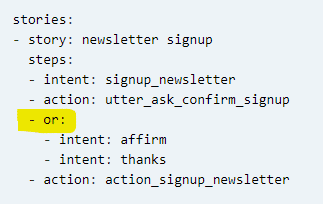
However, you may be really expressive with your story file. For instance, you might use or statements. The story that follows uses an or statement to suggest that a user may confirm a signup using either the affirm or the thanks intent.
You can also use checkpoints in stories.
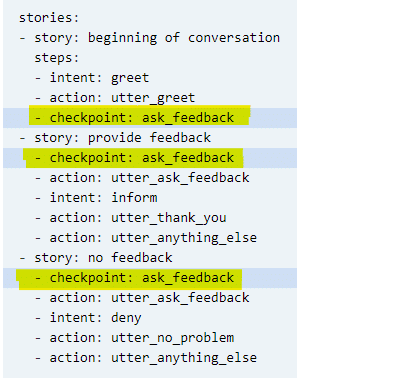
Though using or and checkpoints are useful to make your training data simple but overuse of these will makes your model hard to understand and will increase the training time.
Rules
Rules are used to train your dialogue management model. It defines the short piece of conversation flow that need to be always follow. Like if this than that.
This rule says if your assistant sees greet intent then it must reply with the utter_greeet response.
Entities
An entity can be important information that your assistant can use. Entities can be anything like number, dates, country names, product name etc.
To extract entity from text you can use following methods: –
- Using Prebuilt models: –
- Duckling for extracting numbers, dates, url, email id
- Spacy for extracting names, product names, location
- Using regex: –
- You can use regex in nlu.yml file it can be good to detect postcode phone codes or certain data that matches a regex pattern.
- Using ML
- Rasa uses DIET classifier that can easily detect entities from the message just you need to provide enough training data.
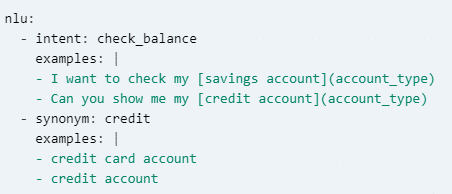
Synonyms
You can define synonym list in your nlu.yml file as it is important to use as user might use similar words instead of the word we define in intents. For instance, user say I want my credit balance which refers to credit account balance.
Roles and Groups
Roles and groups come handy when you want to extract some additional inform from the text. For example, “I want to book a flight ticket from Ahmedabad to Chennai.” Here you not only want to extract two cities but also wants to extract origin city and destination as well.
nlu:
– intent: book_a_flight
examples: |
– I want a flight from [Ahmedabad]{“entity”: “location”, “role”: “origin”} to [Chennai]{“entity”: “location”, “role”: “destination”}
Similarity, you can also add “group” information to an entity. In the example below, the group is used to indicate that we’re talking about pizza #1.
nlu:
– intent: order_pizza
examples: |
– I want to buy a large pizza with [cheese]{“entity”: “toppings”, “group”: “1”} and [mushrooms]{“entity”: “toppings”, “group”: “1”}
Entities can also influence conversations just like an intent is an element of story pattern, an entity might also be steer the conversations.
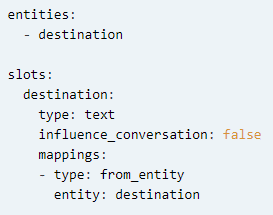
Slots
Slots are nothing but the variables which is used to store information which your assistant can use it later to perform certain task.
You can define slots in domain.yml file with their name and also whether they will be influencing conversation or not. Slots can be of different types which are as follow: –
- Text
- Boolean
- Categorical
- Float
- List
- Any
Slots can be defined in two ways:-
- Using NLU
- Custom Actions
This is the way you can add custom slots.
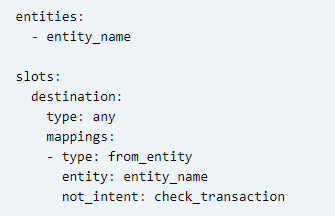
Slots Mappings
It allows you to define how each slot will be filled in. Slot mappings check for the slot after every user message.
Slot Mappings allows you to check condition before storing the value in the slot. For instance, you have entity with name entity_name and you need to store it’s value if the make_transaction intent is detected.
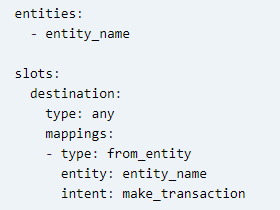
Alternatively, we might also declare that we only want to detect the slot value if the current intent is not check_transaction.
Slot Mappings gives you more control to store slot as it prevents your assistant from storing the value in slot if user query has out of box entity.
There are many types of slot mappings available from there are four most commonly used. They are as follow: –
- Intent: only applies when intent is present
- Not_intent: it’s not applicable if intent is present
- Role: it’s applicable when extracted entity has a particular role.
- Group: it’s applicable when extracted entity belongs to a particular group
For more information click here
Pipeline and Policies
Rasa uses ML approach to make predictions about the user intent as well as predicting what will be the next actions. These pipelines can be written in config.yml file.
The config file consists of 2 parts
- Pipeline
- Policy
Pipeline
Pipeline part is used for intent prediction and entity extraction. There are different components in pipeline like tokenizers, featurizers, intent classifier, entity extractors.
Policy part is used for selecting best next action. There are three main policies which are mention by default in config file. They are:
- Rule Policy this policy look if any intent matches the rule which are defined in rules.yml
- Memoization Policy this policy look if the current conversation flow is matching with any stories which are defined in stories.yml file if so then it will predict next action according to that story.
- TED Policy it uses ML to predict next action.
For more information you can click here
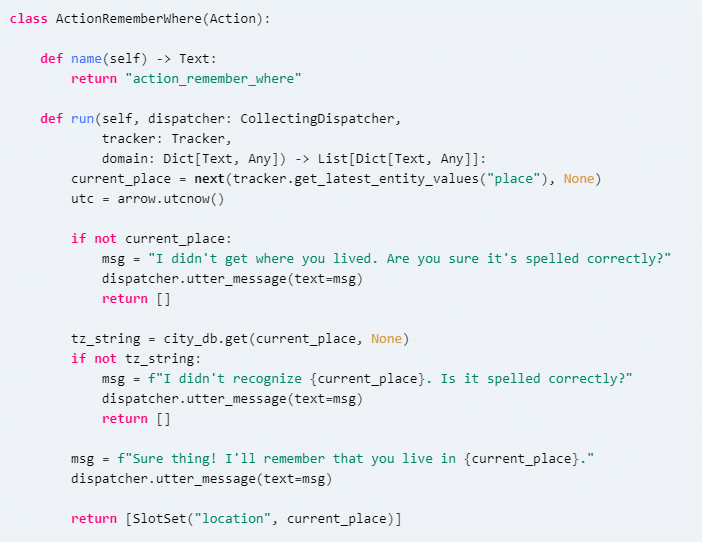
Custom Actions
A Custom Actions is nothing but think it like you want to perform certain actions like calling an Api, database queries, send an email, save calendar event, or to do something specific. We can achieve this by writing some specific functions.
There are few things you need to keep it mind before writing custom actions.
- You need to inherit Action class from rasa_sdk as it handles lots of boiler plate.
- The method name(self) returns the action name which you need to mention in domain file and make sure its case sensitive.
- The method run contains your code. Also, this method receives info from tracker input. You can learn more about tracker by referring the docs here.
- To send a response to user you need to use dispatcher.utter_message method.
Running the action server: –
To interact with your assistant, you need to run action server first and after that run rasa shell command in the separate terminal.
Using the below command, you can start action server.
rasa run actions – -port 5055
You also need to check endpoint.yml file before running rasa shell. Make sure your rasa shell can find custom actions. Also, you have to properly configure action endpoint. If you’re running action server on port 5055 then this should suffice:

For more information you refer the docs here.
Rasa Forms
Basic Forms: –
There will be time when you need to collect information from the user to perform certain task at time. Like user wants to book a movie ticket then you need to ask time, movie name, no. of people, type of seat etc. To make the collection easy Rasa uses the concept of form.
You can think form like a loop which will looped until the slot values are filled. The idea behind form is that we do not ask user questions if the user already mention some slot value for example, I want to book a ticket for 3 people so, we don’t ask how many number of tickets you want to book.
You need to mention forms in domain.yml file also, you need to update your rules.yml file so that Rasa understand that you need to trigger a form. For more info check the docs here.
Custom Forms
Suppose when the conversation flow is going perfectly that is called Happy path. Imagine when user interrupt the conversation by asking out of context question then your assistant suffer to answer so to handle this kind of unhappy path custom forms can be used. After answering to the out of context questions your assistant need to fallback to the form.
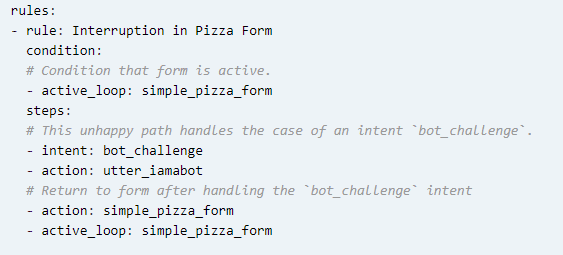
In the above code you can see how to handle unhappy path.
Stopping a Form: –
Normally, form is stopped when all the required slots are filled. But what if user wants to stop a form early? In this scenario we need to think how we can deactivate the form. To implement this behaviour, we need to write story for that. For instance, the below code shows implementation.
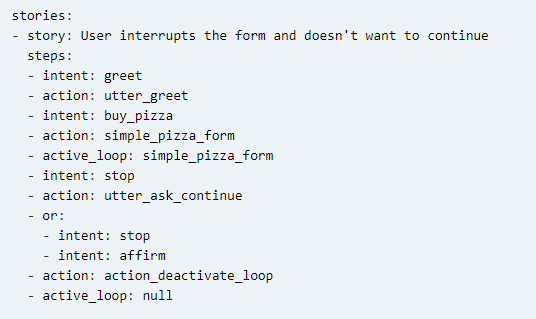
There are few things you need keep in mind.
Here, we used stories instead of rules because rules are used for short patterns. You’re only allowed to have one intent that you used in rule, as this won’t work in a scenario like this in production, so here MemorizationPolicy will take over instead of RulePolicy.
For more information on forms customization, you look at docs here.
Integration with Website
To integrate with rasa assistant, you need to start small server which will communicate with your assistant via HTTP method. Not only you can integrate your assistant with website you can connect it with different channels like Slack, WhatsApp, Telegram, Messenger etc. For that you need to configure credentials.yml file.

For more info you can check the docs for learning here and other docs here.