Introduction
Manual UI testing is tedious and often suffers from inefficiencies, such as how much time it takes, human error, and difficulties around scale.
A good GUI (graphical user interface) automated test simulates the actions of a manual tester. In such a test, the automated script interacts with buttons, text fields, and other elements in the same way as a manual user would. This is meant to follow/mimic real-life scenarios.
Selenium is a wonderful answer for manual testing and the many inefficiencies and problems caused by it.
2. Understanding Selenium
Overview: Selenium is a powerful automation tool for web applications, consisting of components like:
- WebDriver – for browser automation
- Selenium IDE – for recording and playback of tests
- Selenium Grid – for running tests in parallel across multiple environments
Key Features: Selenium stands out for UI testing due to its cross-browser capabilities, support for multiple programming languages, and seamless integration with various tools, IDEs and frameworks.
In the following article, we are going to talk about how to create an automated Selenium UI test with WebDriver, combining the Java programming language, the executable WebDriver and the selectors we need to interact with on the web page.
3. Benefits of Selenium
- Open Source
- Cross-Browser Compatibility
- Support for Multiple Programming Languages like Java, Python, CSharp, Ruby, JavaScript
- Multi browser support, including Chrome, Firefox, Microsoft Edge and Safari
- Easy Integration with CI/CD Tools like Jenkins, GitLab CI, etc…
- Cross-Platform Testing
- Active Community Support
- Parallel Test Execution
4. Transforming Your UI Testing Workflow
Configuring Your Selenium UI Testing Environment
Selenium has easy installation with maven as well as jar files available in Java for basic setup.
- Pre-setup of Java in your system is required. (It must be configured in your environment variable path).
- Install your favorite IDE
- Create a new Maven project
- If you know Java, building a Maven project is straightforward. Maven
- Add Selenium and Webdrivermanager dependencies to your pom.xml file.
<dependency>
<groupId>org.seleniumhq.selenium</groupId>
<artifactId>selenium-java</artifactId>
<version>4.23.1</version>
</dependency>
<dependency>
<groupId>io.github.bonigarcia</groupId>
<artifactId>webdrivermanager</artifactId>
<version>5.9.2</version>
</dependency>
Create your first Selenium test to open a Chrome browser
- Create a new test class and write your first selenium script to open Chrome using Java.
This is just a basic Java program to try out Selenium.
package dev.selenium.hello;
import org.openqa.selenium.WebDriver;
import org.openqa.selenium.chrome.ChromeDriver;
public class HelloSelenium {
public static void main(String[] args) {
WebDriverManager.chromedriver().setup(); // Setting up the ChromeDriver using webdrivermanager
WebDriver driver = new ChromeDriver(); // Initializing WebDriver with ChromeDriver
driver.get(“https://selenium.dev”); // Navigating to the specified URL
driver.quit(); // Closing the browser and ending the session
}
}
Best Practices with POM and TestNg for automation framework
- To implement the pom (Page Object Model) file effectively within an automation framework, you can use a Maven project combined with the TestNG library, which will help in generating comprehensive HTML reports. The following best practices in project structure and organization are as follows:
src
|__main
| |__java
| |__com
| |__qa
| |__pages
| |__utils
src
|__test
| |__java
| |__com
| |__qa
| |__tests
|__test
| |__resources
| |__testData
| |__testng.xml
- Add the TestNG library from the marketplace available within your IDE, and then include the TestNG dependency in your Maven project’s pom.xml file.
<dependency>
<groupId>org.testng</groupId>
<artifactId>testng</artifactId>
<version>7.10.2</version>
<scope>test</scope>
</dependency>
Identify Web Elements
Finding elements from a Web Form. Chrome has different extensions to help with finding elements from a Web Form, like Chropath and SelecturesHub.
Right clicking on the web page and clicking on inspect will open developer tools. Here, you can check for elements available for current web page.
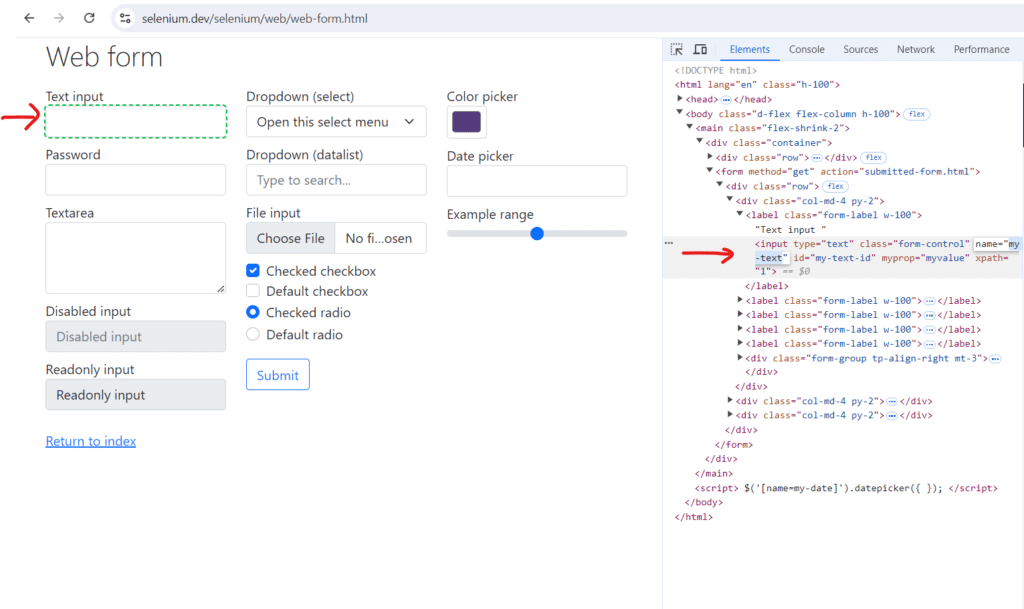
Selenium provides various locators to interact with web elements in a browser. In Java, you can use the methods from the By class to find elements. Here are some commonly used methods:
- By.className(String className)
- By.cssSelector(String selector)
- By.id(String id)
- By.name(String name)
- By.partialLinkText(String linkText)
- By.tagName(String name)
- By.xpath(String xpath)
Each method corresponds to a specific locator strategy, allowing you to identify and interact with web elements efficiently.
Selenium Script with TestNG Example
Here’s an example of testing a web form on the Selenium website. The test will check the webpage title, input text into the form, click the submit button, and then verify the displayed message.
public class Testclass {
// Declaring the WebDriver instance
WebDriver driver;
// This method will run before each test method
@BeforeMethod
public void setup() {
WebDriverManager.chromedriver().setup(); // Setting up the ChromeDriver using WebDriverManager
driver = new ChromeDriver(); // Initializing the WebDriver with ChromeDriver
}
// This is the test method that will be executed
@Test
public void eightComponents() {
driver.manage().timeouts().implicitlyWait(Duration.ofMillis(500)); // Setting an implicit wait for locating elements
driver.get(“https://www.selenium.dev/selenium/web/webform.html”); // Navigating to the specified URL
String title = driver.getTitle(); // Capturing the title of the webpage
assertEquals(“Web form”, title); // Verifying the title of the webpage
WebElement textBox = driver.findElement(By.name(“my-text”)); // Locating the text box element by its name attribute
WebElement submitButton = driver.findElement(By.cssSelector(“button”)); // Locating the submit button using a CSS selector
textBox.sendKeys(“Selenium”); // Sending text “Selenium” text to the text box
submitButton.click(); // Clicking the submit button
WebElement message = driver.findElement(By.id(“message”)); // Locating the message element by its ID attribute
String value = message.getText(); // Capturing the text from the message element
assertEquals(“Received!”, value); // Verifying that the message text is “Received!”
}
// This method will run after each test method
@AfterMethod
public void teardown() {
driver.quit(); // Closing the browser and ending the session
}
}
Selenium can be seamlessly integrated with TestNG, which offers powerful annotations and assertions to enhance test validation. In the example above, the @BeforeMethod and @AfterMethod annotations ensure that the setup and teardown methods are executed before and after each @Test method, respectively.
TestNG also automatically generates HTML reports, which can be found in the test-output/index.html folder after the script runs successfully.
Additionally, TestNG provides an emailable report, which can be integrated into the code to trigger an email with the report after each test run.
The TestNG HTML report appears as follows:
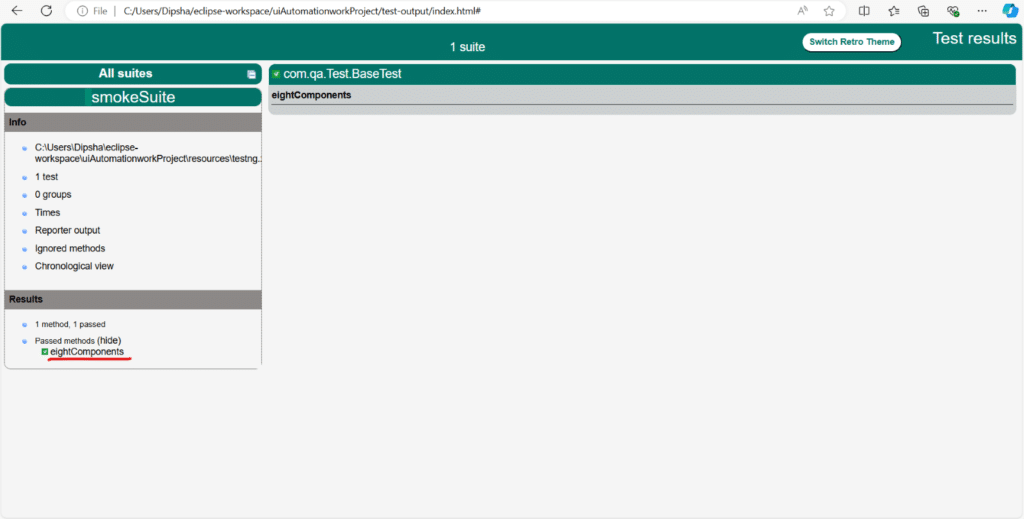
The report indicates that the method executed successfully, with all assertions passing.
If we wanted to run a scenario with 50 test cases—this report makes it easy to verify whether each test case method passed or failed.
Run Your Selenium Script from Command Line
By class: Execute mvn test -Dtest=Testclass to run all tests in the specified class.
By method: Execute mvn test -Dtest=Testclass# eightComponents to run a specific method within the class.
5. Integrating with CI/CD Pipelines:
Integrating Selenium with your CI/CD pipeline is crucial for automating the entire testing process. Tools like Jenkins can trigger your Selenium tests automatically whenever there’s a code change, ensuring that your UI is always tested before the application is deployed.
Example Jenkins Instructions:
Step 1: Install the necessary plugins (e.g., Maven).
Step 2: Create a Jenkins job and configure it to pull your code from the repository.
Step 3: Add a build step to run your Selenium tests. (e.g., mvn test)
Step 4: Configure post-build actions to publish test results and notify the team. (e.g., Testng results)
This integration ensures that your tests are executed automatically, providing continuous feedback and allowing you to catch bugs early in the development process.
It is also recommended to integrate your project with Git and Jenkins. That way, when the code is modified, an automatic build will start in Jenkins to check the integrity of the code. Thus, you can quickly know if the modifications made in the project affected the integrity of the test automation project.
6. Conclusion
Selenium is a powerful tool that can revolutionize your UI testing workflow. By automating repetitive tasks we are able to reduce human error and scale our testing efforts. Selenium allows you to deliver high-quality applications faster and more efficiently. As you continue to develop and evolve your automation framework, the benefits of Selenium will become increasingly clear, making it an indispensable part of your software development process.